Landscaping

BBQ Installed

Gave the little timber deck I built a second coat of oil and prepared myself to move the BBQ from the cubby house down to La Studio. Let’s not go into detail of the pulling apart, cleaning and moving with all the various little disasters this process entailed. Lets just look at the nice picture. Hope to post some cooking on BBQ shots VERY soon.

Parrot 014

Categories: Landscaping | Leave a comment

Retaining Wall 3 – Glad that’s done

Now it will be just a matter of finding many $$$$ to buy some gravel to go round. stuff 011

Categories: Landscaping | Leave a comment

Retaining Wall 2

Then it was just a matter of starting at the start and working to the end. Phew – think I deserve a Shiraz

ImageImage

Categories: Landscaping | Leave a comment

The Retaining Wall – 1

Should be finished this week as the Strirated Paradotes has moved on. So I started by installing substantial holes. 400mm deep for 800mm posts. Nice and strong. I made a simple depth guage 400mm deep.

Image

Then I cut the posts and painted the cut end as extra sealant.

Image

Categories: Landscaping | Leave a comment

Installing a garden tap

After a couple of weeks of wandering hither and thither to gather water to mix concrete for posts, I thought it would be a pretty darn good idea to install a garden tap down at La Studio.
So I concreted in a 200×50 sleeper. Don’t know how long it was – it was an off cut that looked like it was just the right size. After concreting it in, I decided to put another very small off cut on the top as a platform. Thought it may be a good spot to park a beer. Then I painted it red. I do like painting things red. Or black. But mainly red.

A little while ago, Good Mate let me have an old Balinese garden seat that was rotting in his garden. It has some nice bits of usable timber, so I used some to make an edge for the platform. This also gave me an overhang which helped fit the tap – the tap was fine, really, it was the big lumpy pipe fitting directly under it that was the problem. I left it over night, then this morning, lined up some 1inch black poly pipe with suitable fittings, attached a garden tap and Robert is your Uncle. Decided to put the tap on the side and the hose reel on the back so I could put a bit of calligraphy on the front. As it faces East, I thought Buddha could sit on the top. I should think a nice little garden of native violets around it will finish it off. And there’s still room for a couple of beers on the platform. The calligraphy is double happiness (signifying me and the Responsible Adult) then love twice. I know, I’m sucking up.

Categories: Art, Landscaping | Leave a comment

Timber Sleeper Deck

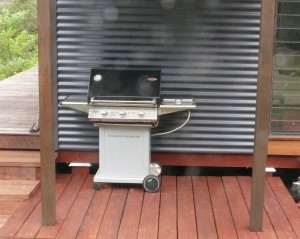
The new deck ready for a bar-be-que

I wanted a place to put the barbie. So I decided to build a deck. Shot edge decking is very nice and very expensive and perhaps a bit too fancy for a barbie – even if it is at La Studio. So I decided to build one out of sleepers. I asked Google to tell me all about it, but Google didn’t seem to know much. So I asked You Tube, but it was unusually vague also. So I asked myself ‘How bloody hard can it be?’ Anyway, I decided to put down 3 sleepers 200 by 75 (the fat ones) by 2.4metres. I had a lovely time getting them level just using my dear old shovel. A little bit off here, a little bit off there – have a beer and think about it and so on. I got there.

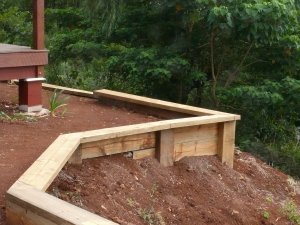
Getting the levels right

 Look at the picture – I even used a spirit level! So to save myself cutting sleepers unnecessarily, I had previously decided that 2.4meters would be a good length. I then decided that 1.8 meters would be a good width so I hunted for some sleepers 150 by 50 by 1.8 but couldn’t find any so I cut down some 2.4’s. The leftovers will be used to make steps down from the deck. Anyway, it was simply a matter of attaching these to the 3 big sleepers. I used 100mm Batten Screws to do this. You need to get the ones marked suitable for treated pine (assuming that like me, you work with the easiest of all timbers)

Screwing in the deck

So each of the decking sleepers has 6 batten screws holding it down. As spacers, I just tapped in a decent size nail to each of the bearers removing them as I moved along. I was going to use 19mm timber as spacers, but the Responsible Adult claimed that anyone in Stiletto’s might loose their heel in them. By the time I woke up to the fact that I have never, ever seen anyone in Stiletto’s hanging around a barbie, the deck was half built and it was too late to go back to my plan.  To finish up, I gave it a coat of Jarrah decking stain. It isn’t as smooth and neat as a shot edge deck, but should be extremely serviceable to sit a barbie on. Now comes the problem of how I move the barbie from the cubby house verandah to La Studio. I should practice my very best swearing.  

Categories: Landscaping | Leave a comment

Well, well, well – 3 holes in the ground

Having moved the timber around the paddock (and increased the size of my manly muscles) its time dig some holes. These three likely looking holes were a breeze. Digging in nice soft red top soil with a crow bar and shovel is easy peasy. These 3 posts will finish the front fence at the house paddock. A job that I started about 10 years ago and never got round to finishing. It will soon be off the bucket list.

                                                                   
Not so easy digging at La Studio. The site had already been excavated to a depth of about a metre, so I’m digging in subsoil. The fossilised velociraptor bones are pretty jarring when I hit them with the crow bar. There’s only a dozen or so of these holes to dig, so I tell myself that they will all be finished by Christmas. In the hole is a very simple depth guide. I want to build a 40cm high wall so the holes need to be 40cm deep at least to take an 80cm post. Oh well, hopefully I will have a very manly 6 pack by the time all these holes get installed.


Categories: Gardening, Landscaping, Tools | Leave a comment

Digging Holes

I’d rather be doing this

So the timbers all moved now comes the next bit of fun, fun, fun. I need to dig some nice big holes to install some posts. Installing timber posts is not a bit like facebook posts. Instead of a keyboard and monitor, you use a crow bar and shovel. And rather than exercising your fingers, you get to use all sorts of muscles – some you didn’t even know you had till they start aching. But instead of the transient nature of facebook posts, your fence posts should last years and years.One thing you don’t normally get with a fence post is likes or comments, but I may have a cunning plan to overcome this deficiency – stay tuned.

As for the picture, well the caption says it all. You too can be just like this. Give your responsible adult a good feed and a few glasses of a nice Shiraz and guide her to the comfy chair.

Categories: Gardening, Landscaping | Leave a comment

Blog at WordPress.com.